Guides 10 min read
Zero Tech Skills, Zero Cost: Build Your Own Top-Level-Domain Blog in 30 Minutes (A Step-by-Step CF CMS Guide)
Zero tech skills, zero cost apart from the domain: 8 steps to build a top-level-domain blog on Cloudflare's free tier with CF CMS, plus how to run it day to day.
Ever had one of those moments?
You've been posting on a platform for two years, and then one throttling, one account ban, and your content and followers are just gone.
So you decide to build a blog of your own. You search for a tutorial: buy a server, set up the environment, configure Nginx, add HTTPS, fend off attacks every day… and you give up before writing a single word.
This post is for you.
I'll walk you through building an independent blog on your own top-level domain on Cloudflare, using the open-source project CF CMS. The site you're reading right now was built exactly this way.
Let's be upfront:
- Zero tech skills: no coding required. The whole thing is copy, paste, Enter. Too lazy even for that? Hand the commands to an AI agent and let it run them.
- Zero cost: apart from the domain itself (cheap extensions run a few dollars a year), the site, database, image storage, and automatic translation all run on Cloudflare's free tier. No server to rent.
Ready? Let's go.
The bottom line: what you get
- ✅ A top-level domain that's yours, like
yourdomain.com - ✅ Automatic HTTPS + a global CDN, as fast as the big sites
- ✅ Five languages: Chinese, English, Japanese, Spanish, and Arabic. Write once, translate on save
- ✅ 8 prefab templates + one-click logo, favicon, and theme color
- ✅ An admin hidden behind a random secret path; plain
/adminreturns 404 - ✅ A built-in MCP endpoint, so an AI agent can publish posts and change settings for you
You only need three things:
- A domain (I'll show you how to get one)
- A free Cloudflare account
- A computer with a terminal (macOS / Linux; on Windows, WSL is recommended)
One diagram: where does it actually run?
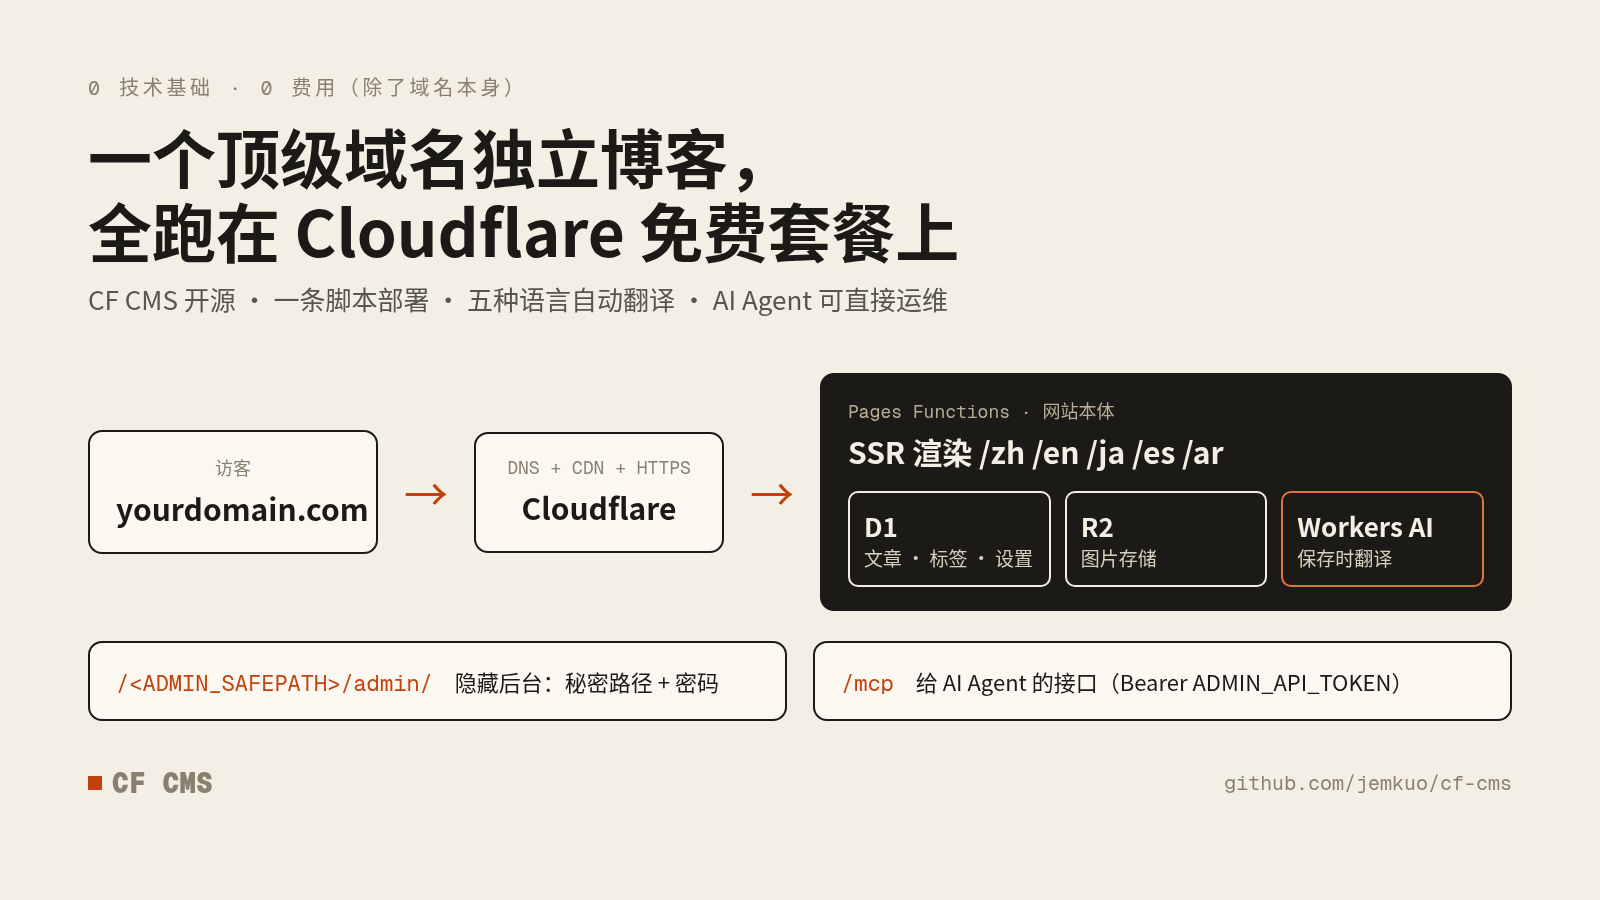
In short:
- Pages: the site itself, rendering every page
- D1: the database for posts, tags, and settings
- R2: image storage
- Workers AI: translates your post into the other four languages when you save
There's no server for you to maintain. Patches, scaling, DDoS protection: that's Cloudflare's job.
The whole process in one picture: 8 steps
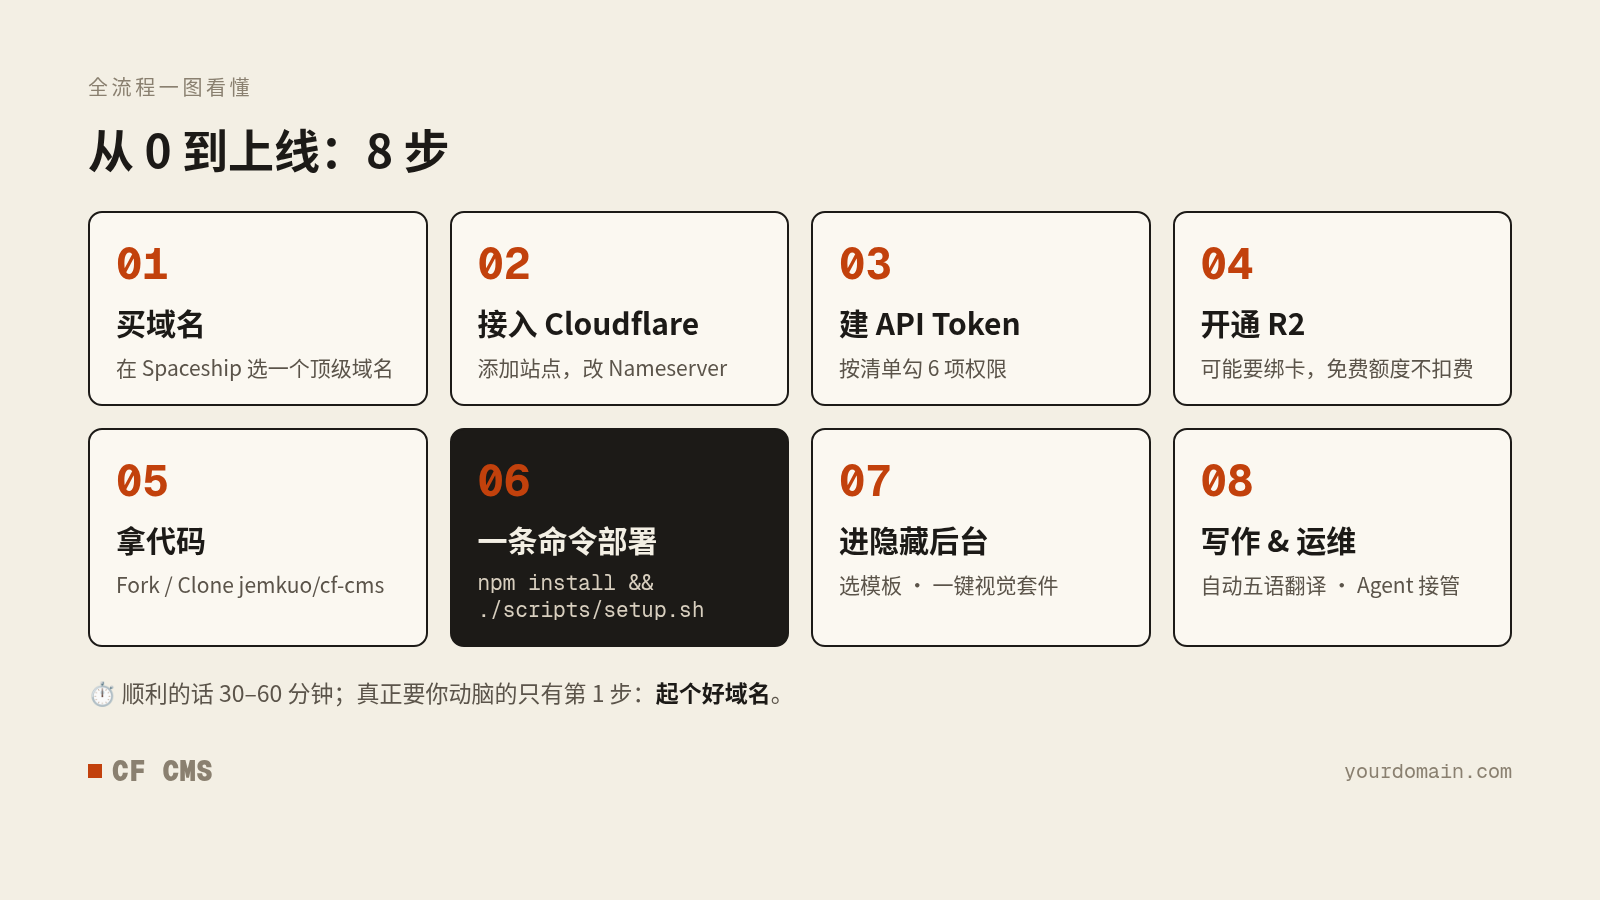
If all goes well, 30–60 minutes. The only step that actually takes brainpower is step 1: picking a good name.
Step 1: Buy a domain
A domain is your street address on the internet, and it's the only thing in this setup that costs money.
Any reputable registrar will do, for example Spaceship, Cloudflare Registrar, or Namecheap. Pick one with transparent pricing, fair renewals, and WHOIS privacy.
Three quick tips for choosing a domain:
- Short, memorable, easy to spell. If you can say it out loud to a friend, it's a good domain.
- Check the renewal price, not just the first year. Some extensions are dirt cheap in year one and cost several times more in year two.
- Don't obsess over
.com:.cc,.dev, and.meall work great for a personal blog.
Step 2: Connect your domain to Cloudflare
- Go to the Cloudflare website and sign up for a free account.
- Click Add a site, enter your domain, and choose the Free plan.
- Cloudflare gives you two nameserver addresses.
- Go back to your registrar's dashboard and replace the nameservers with those two.
- Wait a few minutes to a few hours. Once Cloudflare shows Active, you're done.
Key point: the domain must be in the same Cloudflare account you'll deploy with. The setup script uses your API token to find it.
Step 3: Create an API token (just copy this)
Path: profile icon in the top-right of Cloudflare → My Profile → API Tokens → Create Token → Create Custom Token.
Tick each permission shown below:
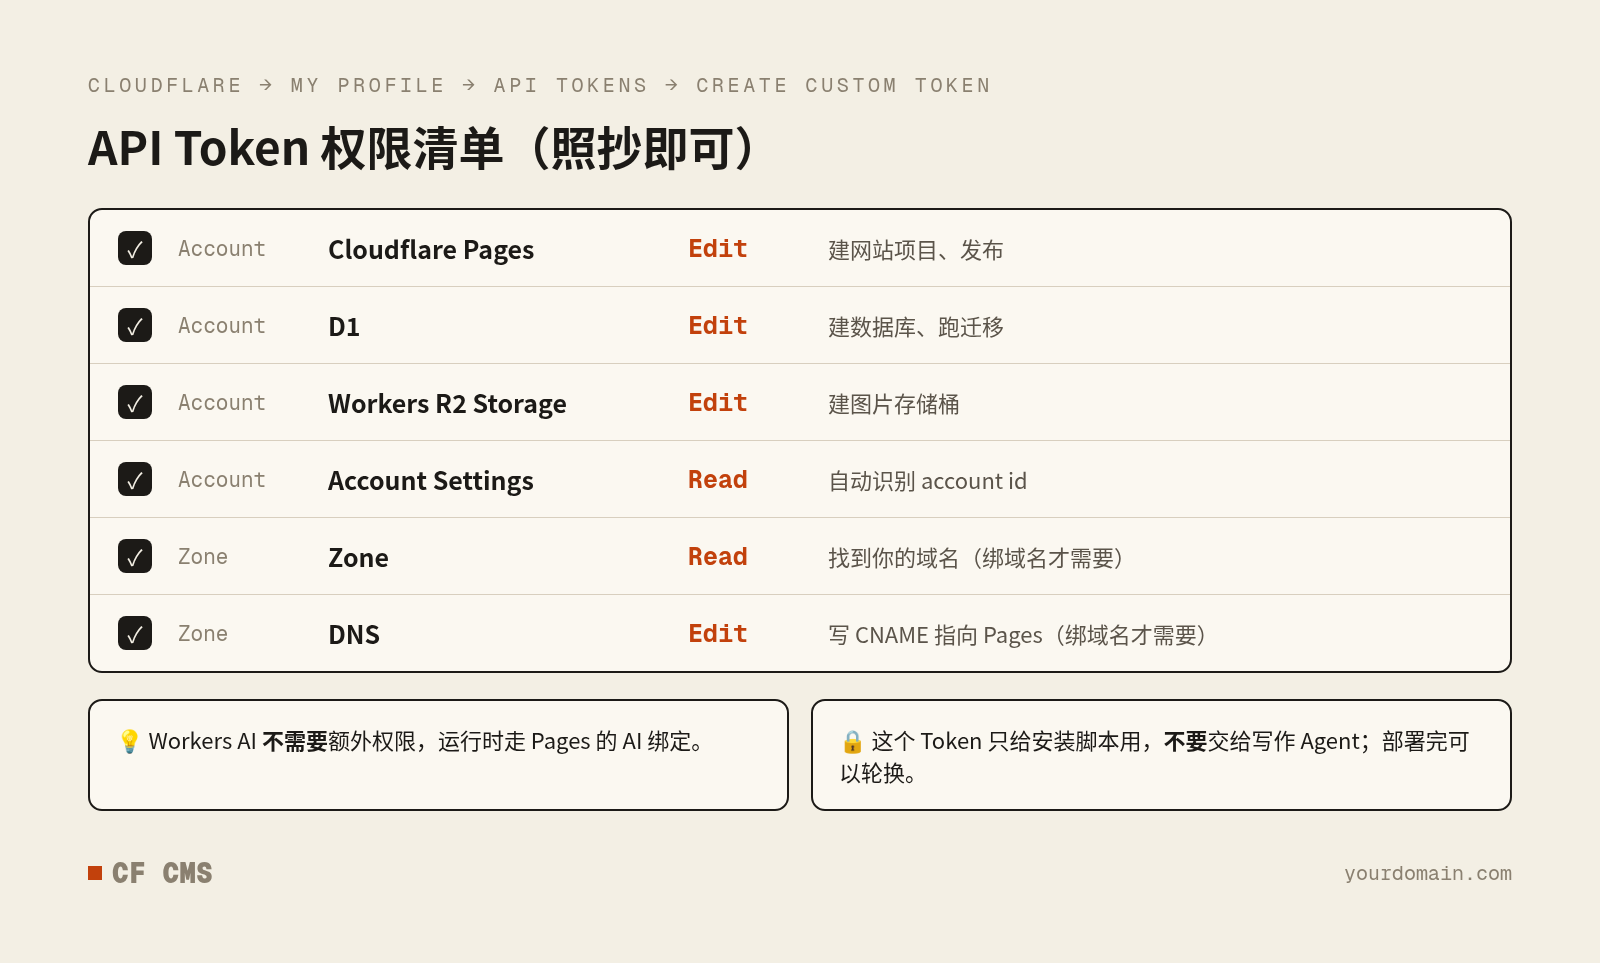
- Account · Cloudflare Pages · Edit
- Account · D1 · Edit
- Account · Workers R2 Storage · Edit
- Account · Account Settings · Read
- Zone · Zone · Read (when you use your own domain)
- Zone · DNS · Edit (when you use your own domain)
Two reminders:
- Workers AI needs no extra permission. At runtime the site uses the Pages AI binding.
- This token is for the setup script only. Don't give it to your writing agent. It's shown only once, so save it right away.
Step 4: Enable R2
R2 is where your images live, and it must be enabled by hand in the dashboard first. The script can't click that button for you.
Open R2 in the left sidebar of the Cloudflare dashboard and enable it.
⚠️ Honest note: some accounts must add a card or PayPal before enabling R2. Don't panic. Adding one doesn't mean you'll be charged: usage within the free tier (10 GB of storage) is free. A personal blog's images will hardly ever use it up.
This is exactly where my first deployment got stuck: the script stopped halfway with 10042 because R2 wasn't enabled. I enabled it, reran, and it went straight through.
Step 5: Get the code
CF CMS is open source, and the code is on GitHub: github.com/jemkuo/cf-cms
Pick one:
- Recommended: click Fork on GitHub to copy it into your own account, which makes future changes easy.
- Or clone it directly:
git clone https://github.com/jemkuo/cf-cms.git
cd cf-cms
You'll need Node.js 20 or newer installed (download the installer from the official site and click through).
Step 6: Deploy with one command ⭐
This is the heart of the whole post. First, put the token from step 3 into an environment variable (it lives only in your terminal, and the script never prints it):
export CLOUDFLARE_API_TOKEN=paste-your-tokenThen, one command:
npm install && ./scripts/setup.sh --project myblog --domain yourdomain.comReplace myblog with the project name you want and yourdomain.com with your domain.
Nervous? Add --dry-run for a rehearsal that only checks and creates nothing:
./scripts/setup.sh --project myblog --domain yourdomain.com --dry-runIt gives your setup a "health check" first
Before touching anything, the script prints a preflight checklist: token, account, Pages, D1, R2, and domain, each ticked off one by one.
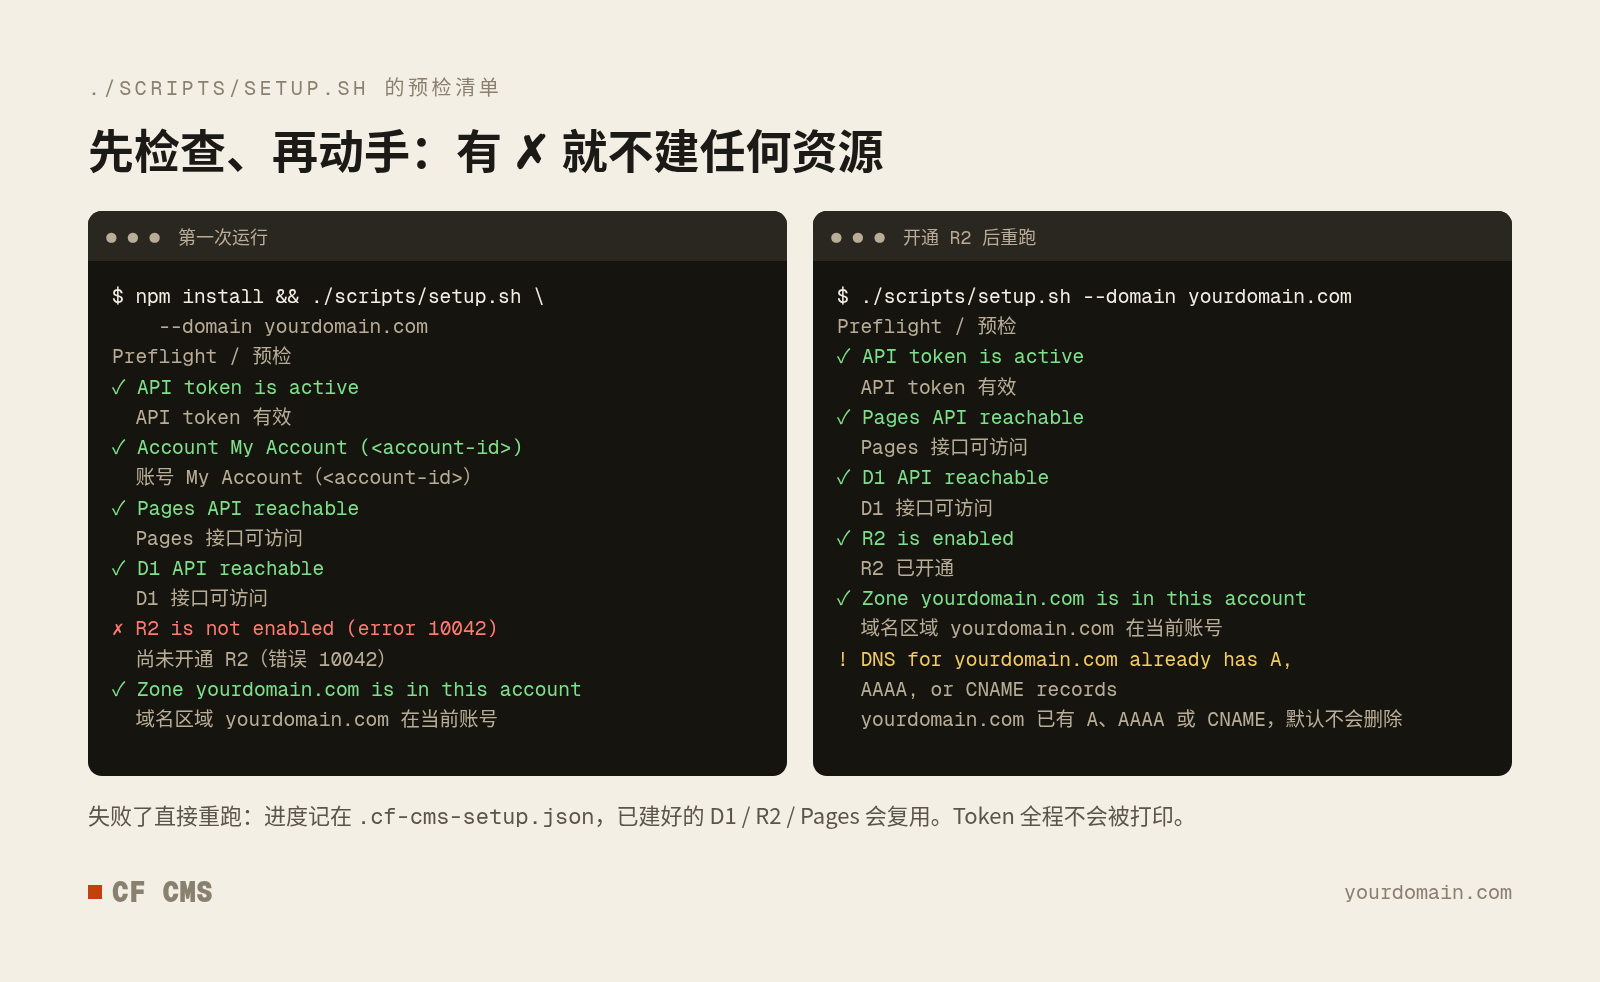
- All ✓: it creates the D1 database, R2 bucket, Pages project, and secrets, then publishes the site.
- Any ✗: it creates nothing at all. It tells you which step failed, where to fix it in the dashboard, and which command to rerun, in both Chinese and English.
- No hunting for your account id: when the token can see only one account, the script fills it in for you.
Failed halfway? Just rerun
Progress is stored locally in .cf-cms-setup.json. A rerun picks up where it left off. The D1, R2, and Pages resources already created are reused, never duplicated, and your posts are never wiped.
Old records on your domain? It asks first
If your domain used to point at another server, the script lists the old A / AAAA / CNAME records first and leaves them alone by default.
Once you're sure they can go, rerun with --replace-dns (or answer y at the prompt), and it swaps them for a CNAME pointing at Pages:
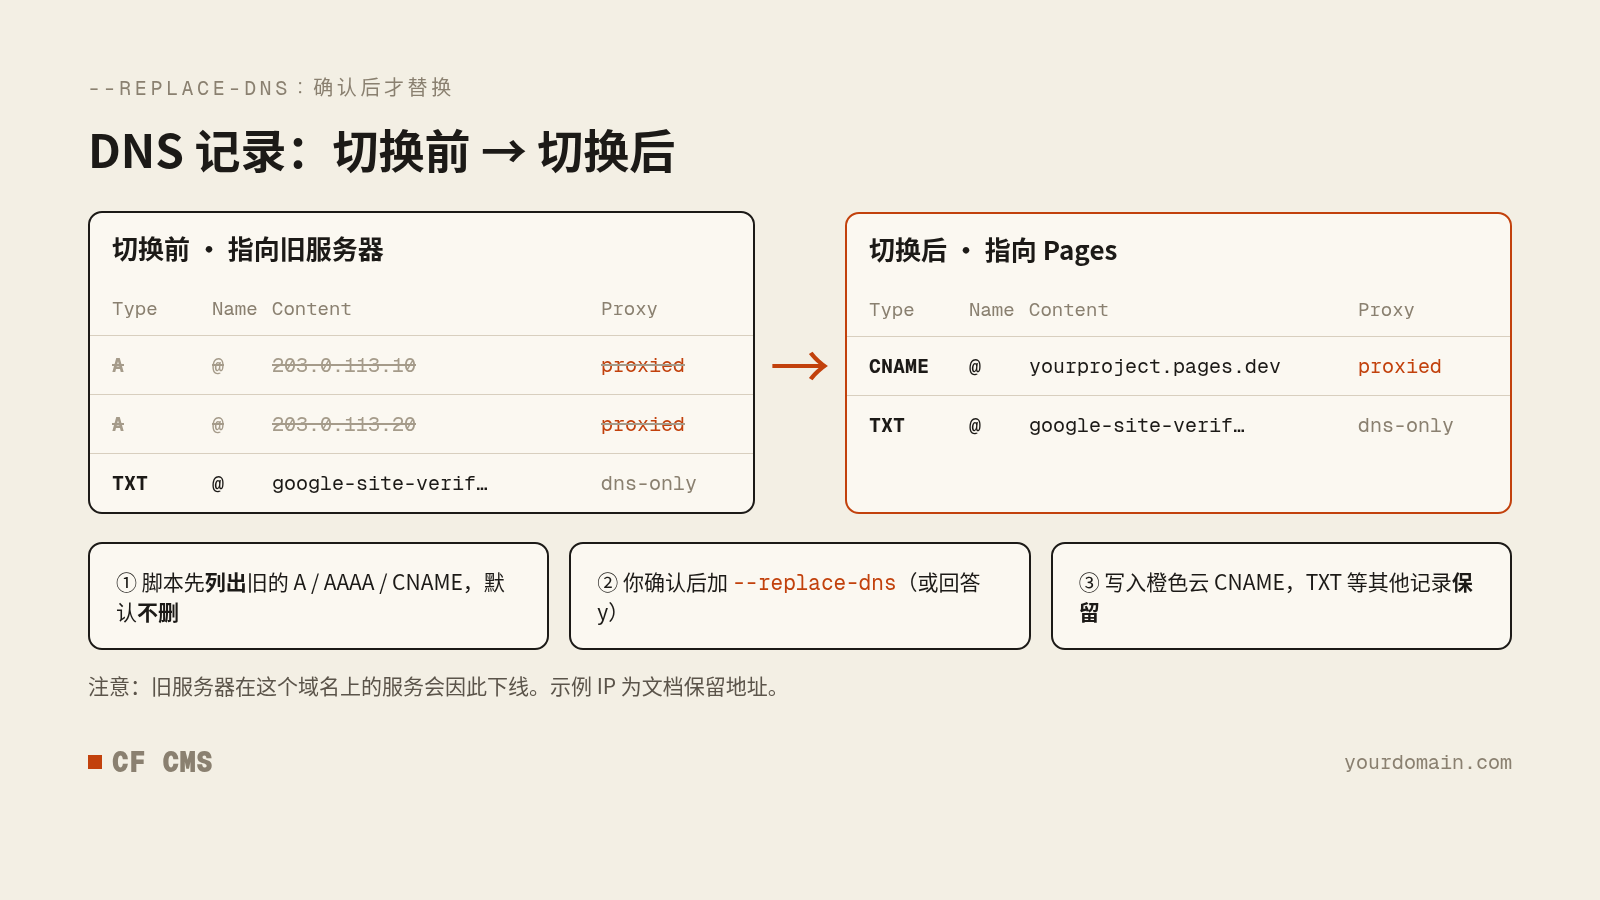
Heads-up: after the swap, whatever the old server hosted on this domain is no longer reachable. TXT and other records are kept.
When it finishes
The last thing the terminal prints is the Admin URL, like this:
Admin: https://yourdomain.com/<ADMIN_SAFEPATH>/admin/The admin password is randomly generated and written to .dev.vars in the project folder. It's never shown on screen.
👉 Keep the Admin URL and .dev.vars somewhere safe. Together they're the keys to your blog.
If the domain status shows pending, relax. Certificate issuance and DNS propagation usually take a few minutes.
Step 7: Open the hidden admin and make it yours
Open that Admin URL and enter the password:
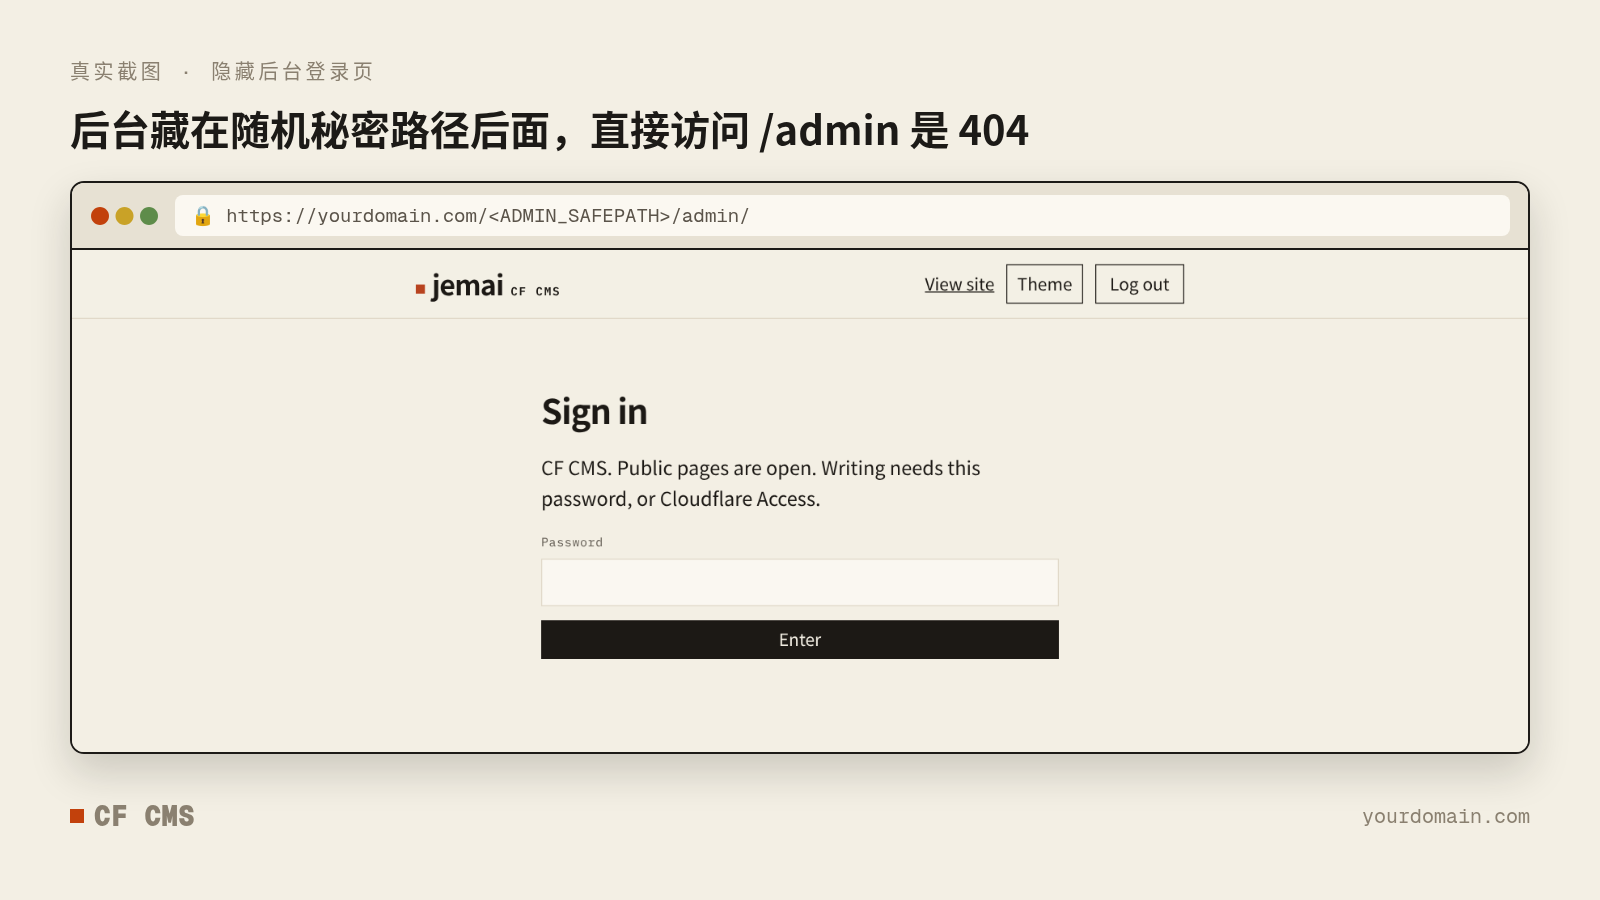
Why hide it? Most scanners hammer /admin and /wp-login. The CF CMS admin sits behind a random path, so plain /admin returns 404 and there isn't even a login form to see.
Once inside, do two things first:
- Choose a template: personal tech blog (Dispatch, Signal), lifestyle (Atelier, Hearth), business homepage (Practice, Civic), tech company (Launch, Orbit), plus the originals Paper, Ink, and Terminal.
- Generate a visual kit in one click: hit Generate visual kit to create a logo, favicon, and theme color that match your template. Don't like it? Generate again, or swap in your own artwork.
Step 8: Write, and get five languages automatically
A freshly deployed site comes with a few sample posts so you can see how it looks:
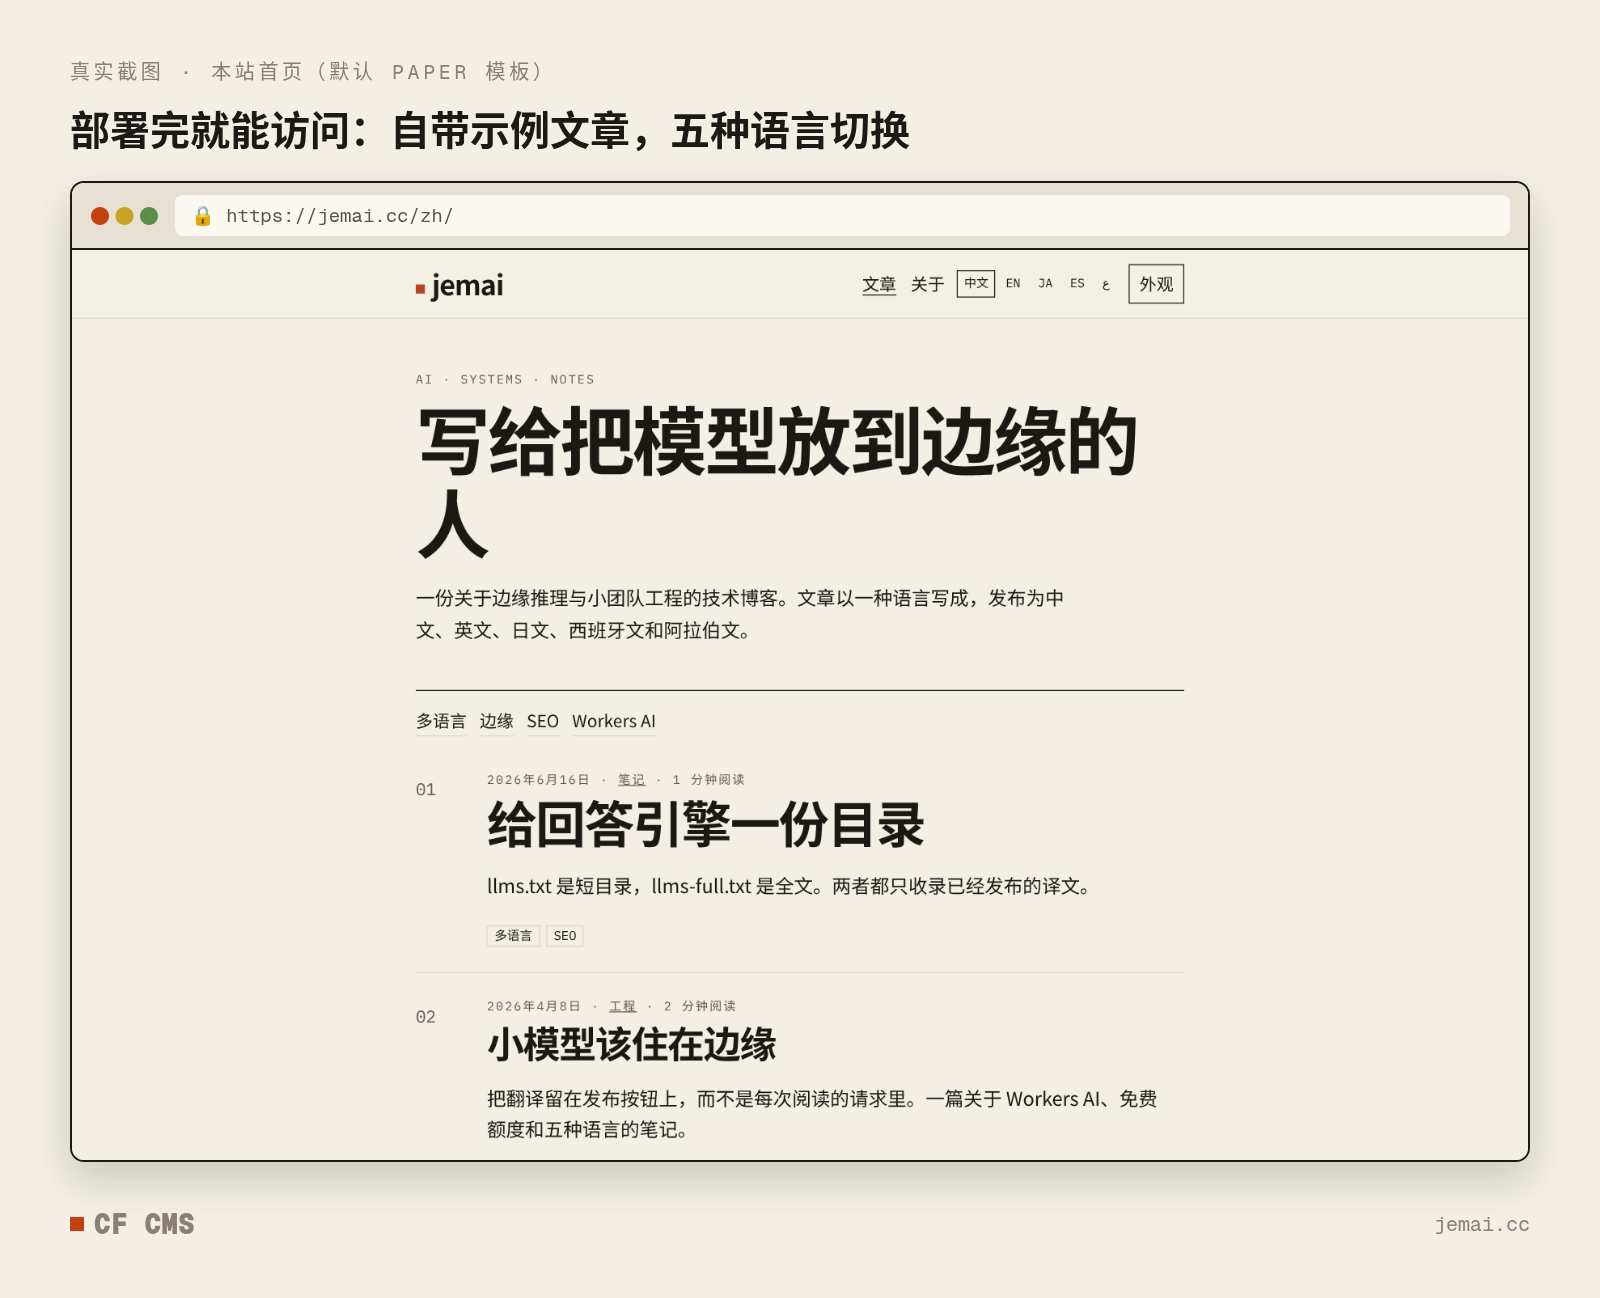
Delete them once you've had a look, and write your own:
- Write in Markdown: headings, lists, code blocks, and images all work
- Upload images directly; they're stored in R2
- Tick translate when you save, and Workers AI generates English, Japanese, Spanish, and Arabic versions (Arabic is laid out right-to-left automatically)
- Set SEO per post: keywords, canonical URL, and Open Graph share image
Write once, and readers in five languages can find you. Plenty of big platforms can't offer that.
Day-to-day: let an AI agent be your editor
Going live is just the beginning. The real time-saver is that day-to-day operations can almost all be handed to AI.
1. Connect an AI agent with one sentence
CF CMS has a built-in MCP endpoint (/mcp on your domain). In Cursor, Claude, or any MCP-capable client, paste the ready-made "one-sentence description" from the project README, add the ADMIN_API_TOKEN from .dev.vars, and your agent can:
- List, create, edit, publish, and delete posts
- Manage tags, channels, templates, and the logo
- Upload images
Once connected, you can simply say:
"Create a Chinese draft with the slug edge-notes in the notes channel, and translate it into the other languages."
Security by design: ADMIN_API_TOKEN can only manage content. It can't deploy, and it can't touch your Cloudflare account. That's also why the Cloudflare token from step 3 should never go to the agent.
2. Rotate secrets regularly
Worried a password or token has leaked? Swap it with one command:
npx wrangler pages secret put ADMIN_PASSWORD --project-name myblogSame for ADMIN_API_TOKEN and SESSION_SECRET. Once deployment is done, you can also delete or rotate the Cloudflare API token from step 3 and create a new one next time you deploy.
3. Know your free-tier limits
| Resource | What it does for the blog | Typical free allotment |
|---|---|---|
| Pages | Site and Functions | 500 builds/month, 100,000 Function requests/day |
| D1 | Posts, settings | 5 GB, daily row read/write limits |
| R2 | Images | 10 GB storage, limited read/write operations |
| Workers AI | Translation on save | 10,000 Neurons/day |
Check the Cloudflare dashboard for current numbers. A personal blog's traffic will basically never hit the ceiling. Translation runs only when you save, not on every visit, and the Workers AI quota resets daily.
4. Common errors at a glance
| What you see | What to do |
|---|---|
✗ R2 is not enabled, error 10042 |
Enable R2 in the dashboard (you may need to add a payment method first), then rerun |
| Token rejected (10000) or missing permission (9109, HTTP 403) | Add the permissions from the step 3 checklist, export the token again, and rerun |
| Domain stuck on pending | Review the old A / AAAA / CNAME records the script lists, then rerun with --replace-dns once you're sure; the certificate still takes a few minutes after DNS is right |
| Pages project name taken | Pick another --project name |
| D1, R2, or Pages already exists | Just rerun; resources with the same name are reused |
| Network error | Check your connection and rerun; finished steps are skipped |
Remember one rule: when something fails, read the message, fix it, rerun. The script tells you where to fix it and what to run.
About "zero tech skills": the honest version
You will open a terminal and type a few commands in this process.
But you don't need to understand what they do. All you have to do is:
- Copy the command
- Paste it into the terminal
- Press Enter and look for any ✗
The even lazier option: give this post and the README to your AI agent and let it run everything. When it gets stuck, it either needs you to click something in the dashboard (like enabling R2) or confirm something (like replacing DNS). Just follow the prompts.
Let's do the math
| Item | Cost |
|---|---|
| Domain | From a few dollars a year (depends on the extension) |
| Server | 0 (Cloudflare Pages) |
| Database | 0 (D1 free tier) |
| Image storage | 0 (R2 free tier) |
| Five-language translation | 0 (Workers AI free tier) |
| HTTPS certificate + CDN | 0 |
| CMS software | 0 (open source) |
Apart from the domain, you don't spend a cent.
Final words
Platforms give you reach, but the turf always belongs to the platform.
An independent blog is a digital asset that's truly yours: your domain, your content, and readers who can find you directly.
Take the first step today: pick a domain you love and follow this guide from start to finish.
Hit a snag while building? Leave a comment. If you find the project useful, a ⭐ for CF CMS on GitHub is always appreciated.
Next up: how to let an AI agent run this blog for you every day.